Character Creation HOWTO
A walkthrough for creating characters
Table of Contents:
- Login Account Method - found in latest or current (aka trunk) servers and clients from SVN or after version 1.50.x
- Player File Method - found in client version 1.50.0 or earlier and servers running 1.50.0 or earlier (and branch/1.x servers)
Login Account Method:
Metaserver Selection
- After you launch the client, a floating popup window will appear and show a list
of public servers
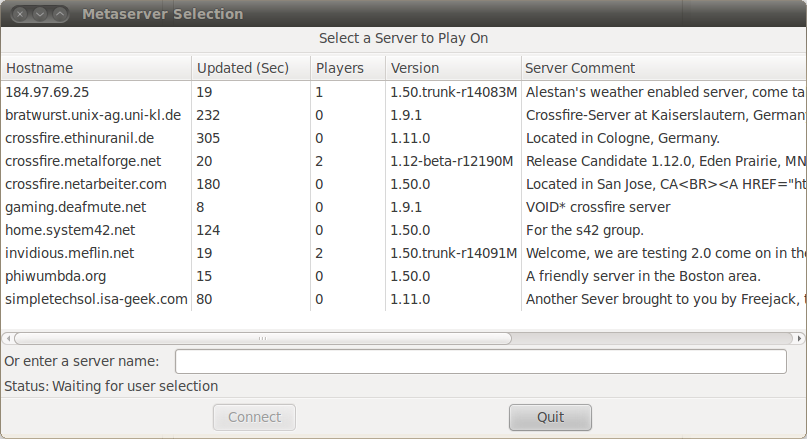
- Here's what the listed information means:
- Hostname = The name (or IP Address) of the server
- Updated (Sec) = How many seconds have passed since a player entered a command. This is useful if you want to see if people are logged on and actually playing (vs. hanging out/doing nothing) or how long a server has been empty.
- Players = The current number of players logged on to the listed server (does not count DM, BOT or players using the AFK command)
- Version = What version of Crossfire the server is running
- Server Comment = Information, note or details as specified by the server host or administrator
- Left click to highlight a hostname and then click on Connect to play on that server; Or, type in a server name (i.e., localhost) or IP Address in the text box and click Connect to play on that server
- Click on Quit to close down and exit the client
Account Login Window
- This is where things really start to change with the Account Based Login, the next window allows you to login as an existing character or if it is your first time connecting to the particular server - create an account on there. The benefit of this set up is, one password for any number of multiple characters.
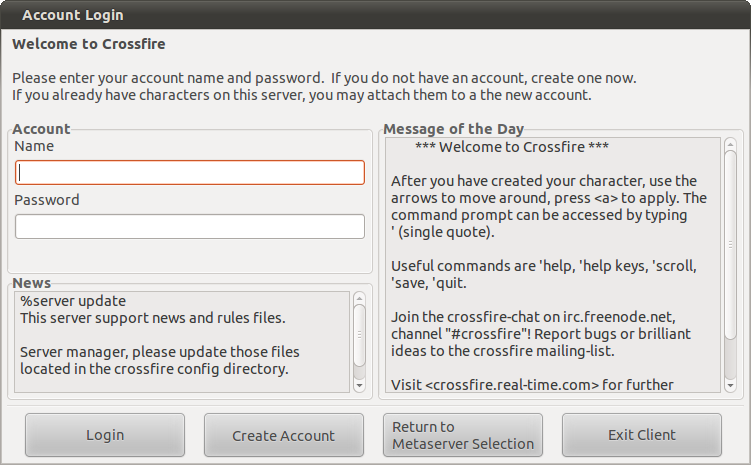
- Here is a summary of the interface:
- In the Account box, you have two fields:
- Name = This is your login name or username for your Player Account; this can be the same as one of your character names - that is entirely up to you
- Password = This is the password for your Player Account (Please chose a reasonably secure password - one that is unique for the server and not used anywhere else)
- News box = This is where the server or game administrator can post updates, recent changes, server events, et al. for players to read about
- Message of the Day box = Similar to the News, but more often used to include helpful or introductory info in regards to Crossfire
- Login button = Used to log in to an existing account on the server
- Create Account button = use to create a user account on the server
- Return to Metaserver Selection button = Allows you to go back to the Metaserver Selection window and pick a different server to connect to
- Exit Client button = This will close down and exit the client
- In the Account box, you have two fields:
Create Account
- If this is your first time connecting to the server you will need to create an account, this is done by click on the Create Account button on the Account Login window (shown above), the interface looks like the following:
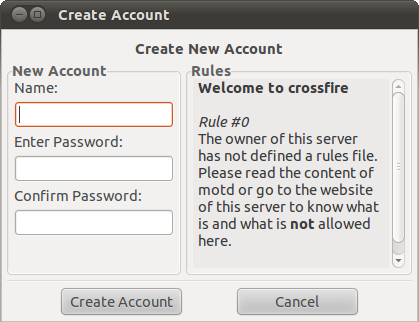
- Here is a summary of the interface:
- In the New Account box we have three fields:
- Name = This is your login name or username for your Player Account; this can be the same as one of your character names or different - that is entirely up to you
- Enter Password = This is the password for your Player Account (Please chose a reasonably secure password - one that is unique for the server and not used anywhere else)
- Confirm Password = Re-enter your password, it must match the password in the previous box
- Rules box = This is where the server host or admin can specify rules for the server such as if Player Killing (aka, PKing or PvP) is allowed, etc.
- Create Account button = This will complete the account creation process
- Cancel button = This will take you back to the Account Login screen
- In the New Account box we have three fields:
Character Selection
- After creating an account, you will now see a window for creatine a new character, the interface looks like the following:
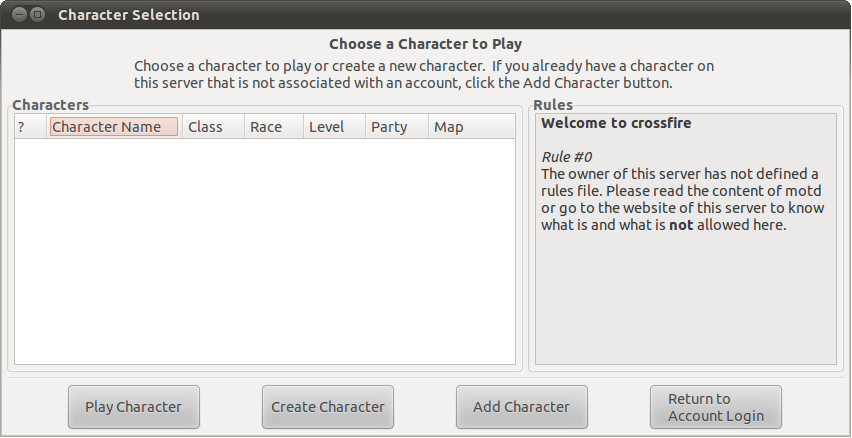
- Here is a summary of the interface:
- In the Characters box, we have multiple columns to display details of any existing characters associated with our Player Account. Here is a summary of what those columns represent:
- ? = what your character looks like in the game
- Character Name = The name of the character that people see or recognize from within the game
- Class = The character's chosen class
- Race = The character's race
- Level = What level the character is when they last applied a Bed to Reality within the game
- Party = Lists a party name (if applicable) that the character was part of when logging off
- Map = Which map (name vs file name & path) that the character was last on when leaving the game
- Rules box = This is where the server host or admin can specify rules for the server such as if Player Killing (aka, PKing or PvP) is allowed, etc.
- Player Character button = Left click to select a character in the Characters box and then click this button to play that character. In this example, the character "Duke" is selected.
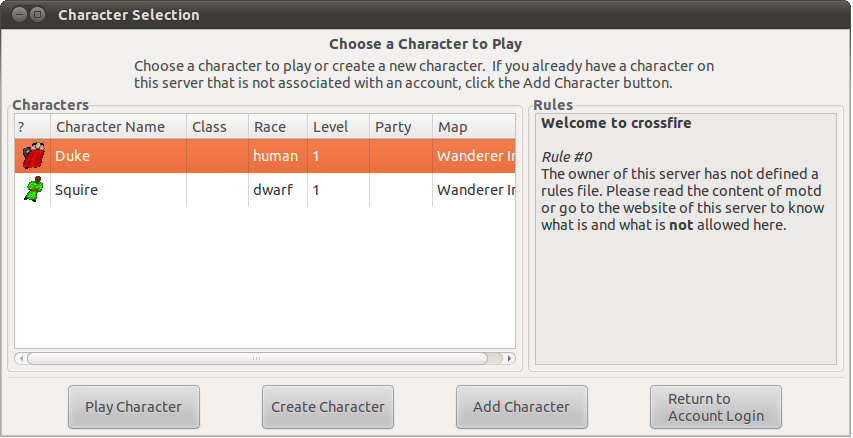
- Create Character button = Used to create a new character for this account on the selected server (see below)
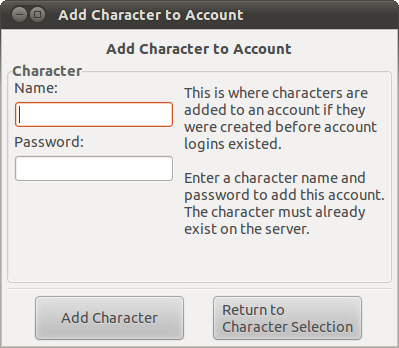
- Add Character button = Allows you to merge or associate an existing player file with this account; most often used when the server or client is upgraded to use this character management method. You will need to type in the character name and that character's password in order to "merge" or associate that player file with your login account.
- Return to Account Login button = Takes you back to the Account Login screen
- In the Characters box, we have multiple columns to display details of any existing characters associated with our Player Account. Here is a summary of what those columns represent:
- The Create Character gives you an interface to choose character name, race, class and stats. This is what the default screen looks like:
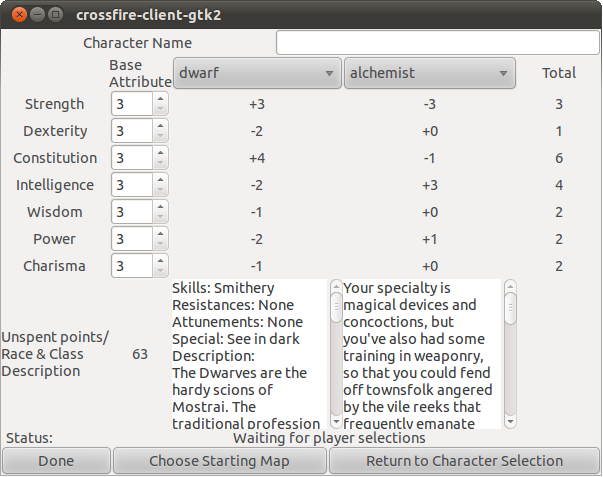
- The interface is made up of multiple sections, here is a summary:
- Character Name = The name of the character that people see or recognize from within the game
- Base Attribute = Your character stats; click on the up arrow to increase the score (max is 18) & click on the down arrow to decrease the score (minimum is 3) - you have a total of 63 points to allocate, see Unspent points
- Race drop down = The race of your character, the numbers listed in the column below the drop down box are how race effects Total attribute score. By default, dwarf is selected.
- Class drop down = The class or profession of your character, the numbers listed in the column below the drop down box are how class effects Total attribute score. By default, alchemist is selected.
- Total = The total attribute score of the character after points, race bonus (or penalty) and class bonus (or penalty) is applied; Maximum total is 30
- Unspent points = Available points to add or modify your character's Base Attribute score
- Race Description = This will list a summary for the Race currently selected in the Race drop down This includes information such as: starting skills, resistances, attunements, special abilities and a brief description
- Class Description = This will list a summary for the Class currently selected in the Class drop down This is mostly in game lore information, however for some classes special restrictions are noted (i.e., monks can not wear armour or use weapons)
- Status = This lets you know if there are any problems with the selections you have made for you character. Normally it just states, Waiting for player selections although you may see Negative attributes are not allowed - adjust your selections before finishing (in that case, you will need to allocate more points to an ability to make the Total at least zero) or You have used more then your allotted total attribute points (in that case, you will need to reduce one of you Base Attribute scores by at last one point - check your Unspent points and see how far of a negative number you have)
- Done button = This will complete the character creation process to the selected Starting Map (see below) for you character (NOTE: if the chose character name is not available, you will be alerted to that when clicking on the Done button)
- Return to Character Selection button = This will take you back to the Character Selection window, detailed above
- Choose Starting Map button = This opens a new display window and lets you pick the starting map or city for your character, the interface looks like the following:
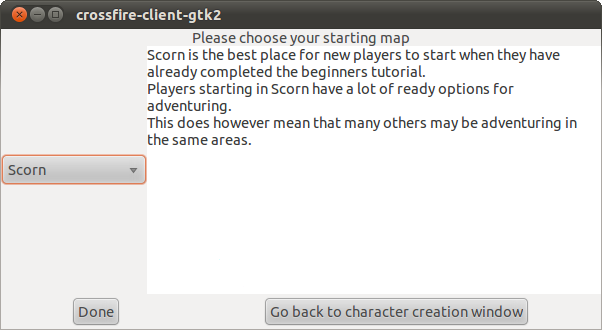
- The drop down on the left lists three locations:
- Scorn - Scorn is the best place for new players to start when they have already completed the beginners tutorial. Players starting in Scorn have a lot of options for adventuring. This does however mean that many others may be adventuring in the same areas. (Note: this is the default starting map)
- Beginners House - The beginners house is a good choice for first time players. It will teach you some of the mechanics of the game. If you have played before, you may chose to skip beginners house and start your adventures in some other location right away.
- Navar City - Navar is a good place for more experienced players to start. Adventurers starting in Navar might have to do a bit more exploring, but then it is more likely you find things. WARNING: Navar is not a "Newbie Friendly" place. True novices should start in beginners house or Scorn.
- Done button = Click here when you have finished selecting your starting map and begin playing the game
- Go back to character creation window button = This will take you back Character Creation Window, detailed above
Once these steps are completed, you should now appear in the chosen starting map, ready to play.
Player File Method:
- Select a Server
- Character Name
- Character Password
- Character Stats
- Select a Character Race
- Select a Class/Profession
Please note, screen shots are from the GTK Client and content based on Crossfire v1.4.0
Select a Server
After you launch the client, look in the right side of the client - a list of public servers will be listed there.
It should look something like this:
#)     Server        #     version   idle
         Name      players           seconds
 1)  12.216.43.64     0   1.4.0        514
 2)  bovine.muck.net  0   1.4.0        341
 3)  bratwurst.unix-  0   1.0.0-07-30  356
 4)  crossfire.aszli  0   1.4.0        116
 5)  crossfire.jyu.f  0                90
 6)  crossfire.plane  0   1.3.0        115
 7)  damn.informatik  0   D-0.91       346
 8)  games.prima.de   0   1.4.0        289
 9)  metalforge.real  7   1.4.0        124
10)  mids.student.ut  0   1.4.0        112
11)  ni.sytes.net     0   1.4.0        271
12)  villa-strayligh  0   1.3.0        97
13)  voldsboks.pvv.o  0   0.95.8-CVS   89
14)  web.chemwatch.n  0   1.4.0        131
15)  xover.mud.at     0   1.3.0        60
16)  zeus.fh-branden  0   1.4.0        206
17)  localhost (default)


Choose one of the entries above or type in a hostname/ip address
Hit enter to re-update this list
Enter 0 to exit the program.
Here's what the listed information means:
- # = Server number. Enter this number to connect to that particular server
- Server Name = The IP Address or hostname of the server
- # players = The current number of players logged on to the listed server
- version = What version of Crossfire the server is running
- idle seconds = How many seconds have passed since a player entered a command. This is useful if you want to see if people are logged on and actually playing (vs. hanging out/doing nothing) or how long a server has been empty.
Once you see the server list, type in a (server) number (or hostname/ip address) and hit enter. You probably want to pick a server that's close to you for reduced latency, etc.
Character Name
Look for a floating window that says, "What is your name?"

Type in a name for your character and hit enter.
Character Password
Another floating window will appear that says, "What is your password?"
Type in a unique password and hit enter.
- If you are prompted for the password again, then the character name is available on that server. Re-enter your password.
- If you get a message that the password was incorrect:
- You may have mistyped the password the second time, try again
- If you continue to see the password error message, then you need to pick a different name, since that one is already in use.
Character Stats
Next, is choosing stats for your character.
- Note: you can re roll the stats as many times as you want.
- This also appears in a popup window as well.
- Click on the Roll again button (or hit the [y] key) to roll new stats
- Click on the ability score button (Str, Dex, Con, et al) or [1-7] [1-7] to
swap stats.
- If you click on the ability score button, the dialog window will update and
ask, "Exchange with which ability?"

- If you enter in a value from 1-7, then another value 1-7, the stats will swap
and display a message similar to this
Cha ->
Pow done
Note: 1 is Str, 2 is Dex, 3 is Con, and so on
- If you click on the ability score button, the dialog window will update and
ask, "Exchange with which ability?"
- Click on the Keep this button (or hit the [n] key) to use the listed stats
For an explanation and description of all the character attributes, visit:
http://crossfire.real-time.com/guides/character/attributes.html
Select a Character Race
Now it's time to pick a race.
- You can click through the list as many times as you want
- This also appears in a popup window as well.
- In the popup window click on "Show next" (or hit the [n] key) to select a
different race.
- The races are listed alphabetically.
- Information for each race is listed on the right side of the client.
- Click on "Keep this" (or hit the [d] key) when you find the race you want.
For more information on the ability modifiers based on race and a brief description
of each, visit:
http://crossfire.real-time.com/guides/character/race.html
Select a Class/Profession
You should now see your character (based on race) in the Hall of Selection. In this example, it's a human standing at the top of the pentagram.
Use the direction keys to wander around the Hall of Selection
- You will want to head south (down)
- As you proceed, read the Crossfire Primers (in game instructions and other information.)
The hallway will lead into a much large room, like this:
In front of each teleporter ![]() is a description of the Character Class. Step on a teleporter to select your class
and begin play in Scorn.
is a description of the Character Class. Step on a teleporter to select your class
and begin play in Scorn.
For a summary of the ability modifiers based on class and a brief description
of each, visit:
http://crossfire.real-time.com/guides/character/class.html
For a list of game Commands, visit:
http://crossfire.real-time.com/commands/player/index.html